Last week, I gave you some tips on how to image different objects in the night sky. This week, I’m going to give you a new tip, but first will force you to look at a slide show. Now, typically when “Father” tells you there’s going to be a slide show, the eyes roll and mystery meetings emerge that call people away from the event. Thankfully, I find with my parishioners and friends, these slides are worth sticking around for instead of finding a spontaneous reason to leave the room… or read another post!
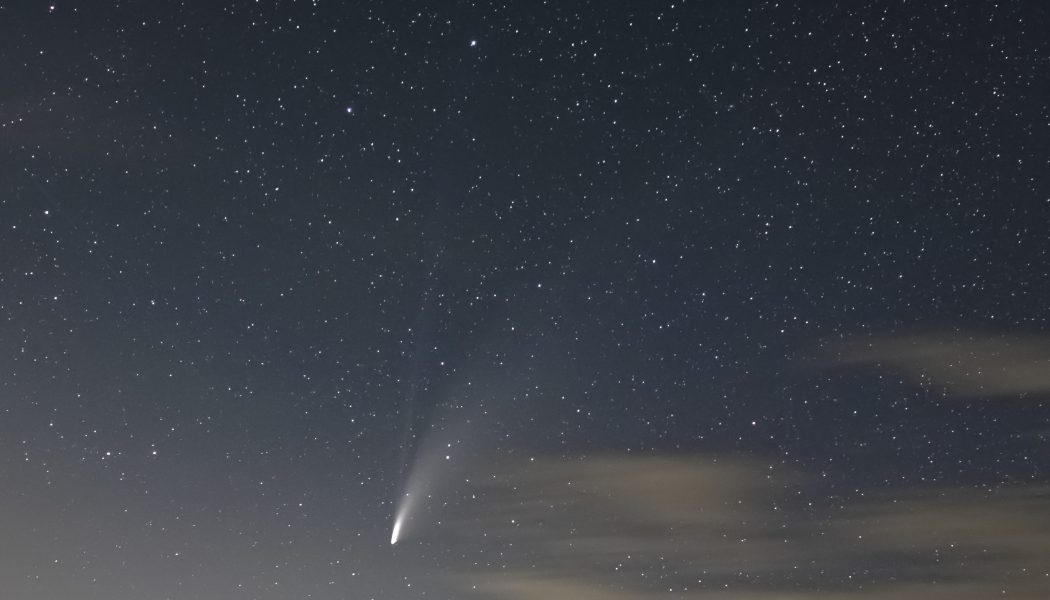
I’ll start with my most recent images from last night! After a week of being sleepless in Wisconsin chasing down dark skies, I was tired. I was temped to drive way north into some super dark skies, but I wanted to get some sleep. So, I drove about 30 minutes to a small town with “okay” skies and captured these images.


Why did I choose these images? I chose them for a number of reasons. First, lets compare the quality. The very first image is a “stack” meaning that I took four images that were 2 minute exposures and used software to combine them. The idea is that stacking images gives you “more data” to play with when editing the image. The rest of the images are single exposures, ranging from 60 seconds to four minutes. Can you tell which is which?
Now, if I were to have you look at the original RAW images out of camera and zoom in at a pixel level, yes, you would clearly be able to see the differences from each image. However, how many people really look at images that way? If I were doing professional research on this comet, then, yes, I would want all the information I could get. For these images, I had two goals: One, relax after a busy weekend of Confirmations and First Communions and, two, see if I could capture the comet’s contail. In short, mission accomplished! My point is don’t feel pressured into doing really complex captures, simply because you saw an astro-photographer on YouTube say that this is how you get best results. You can get very nice shots with very simple tools without stacking images.
I also chose these images to expand my camera tips from last week by introducing you to star tracking. Star tracking is a great and easy way to improve your star photography. A star tracker is a tool that fits between your tripod and your camera and, once aligned to Polaris (North Star), it gives you dependable tracking of objects in the night sky. In order for me to pull out the contrails with the gear I have, I knew I needed exposures of about 60 seconds to 4 minutes. This would be impossible with just a camera and a tripod unless I took multiple images at about 20 seconds and stacked them all on my computer. Both approaches work, but, sometimes, its nice to just open up your camera shutter, let the camera do the work, and take a few minutes to just gaze into the night sky. It also helps give you time to enjoy the entire sky and not just the one object you’re imaging.
The tracker I use for my camera is an Omegon Mini tracker LX2. The reason I prefer this tracker is, one, no batteries are required. The Omegon tracker is a “Swiss watch” design that winds like a pocket watch. It’s gentle ticks let you know its working and tracks for up to an hour. However, I’ve found that, depending on how precise the alignment is, I usually can get good tracking for up to four minutes. The downside is that the payload is only about 4 to 6 pounds (error on the side of four pounds if you get this). Therefore, if you want to get a tracker for your small telescope, you’ll need something more substantial and expensive. However, if what you are looking for is a tracking setup up for your camera and a small lens, I would highly recommend this type of tracker. A number of companies make these dial trackers, so don’t feel like you have to buy an Omegon simply because that’s what I use. We don’t promote companies on this blog. It just happens this is the tracker I own, use, and. most importantly, love to use!

These next images are ones I took from my favorite place to do night photography in the city of Eau Claire: The Pablo Performing Arts Center.


I know, I know, some of you are screaming at the screen, “Why did you waste a night of comet imaging in a light polluted city?” Yes, I pray Eau Claire embraces dark sky practices in the future. However, my goal for these images was to present the city I love with a comet that is a once in a lifetime event. Best comet shot ever? Nope, not even close. But, for me, one of these is going to get printed and put up on my wall. Why? Because this image was for me and speaks to me in ways it wont speak to others.
What is the point of this? If you get into astrophotography, don’t do so in the hopes of getting published, do NASA quality imaging, or any of the other traps that are so easy to fall into. Take these images for you, first and foremost. Take them to satisfy something in you that longs to have a visual catalog of memories from you life. Now, along the way, if you decide to “up your game” and get more professional gear, that’s fine if that’s what brings you joy. What brings me joy? A quiet night, looking at beautiful scenery, and a picture to remember that evening in the future. Simple, simple, simple!
Lastly, here is my favorite image!

I love pictures that use water as a reflector. I found this canoe landing outside of town and knew when I found it that this was going to be one of the locations for a comet capture. 16mm lens, 25 second exposure, and, most importantly, the most peaceful sleepless night I’ve had all year! All I can add to this image is a simple request: Enjoy!
Have you captured comet Neowise? If not, you still have a few days to capture this beautiful celestial visitor. Between this and last week’s post, you should have enough information to take some nice images. The important thing, regardless of how you image this comet, do it in a way that brings you joy. Do it for you! Do it for the Lord.
Happy Monday!
